Introduction
Is your Dell laptop slowing down, freezing, or simply not turning on? It’s a frustrating experience, especially when you rely on your device for daily tasks. But don’t panic just yet! Before you rush to replace your laptop or call for expensive professional help, there are simple troubleshooting steps you can take to diagnose and fix common hardware issues.
In this guide, we’ll walk you through a comprehensive Dell laptop hardware repair checklist that covers common problems and offers actionable solutions. By the end of this post, you’ll know exactly how to address common issues like battery failure, overheating, or malfunctioning components, and whether it’s time to repair or replace certain parts.
Table of Contents
- How to Diagnose Dell Laptop Hardware Problems
- Steps to Fix Dell Laptop Power Supply Issues
- How to Repair a Faulty Dell Laptop Screen
- Dell Laptop RAM Upgrade: When and How
- Dell Laptop Cooling System: Cleaning and Replacement
- Diagnosing and Replacing a Faulty Dell Keyboard
- Troubleshooting Dell Laptop Hard Drive and Storage Issues
- Conclusion and Pro Tips
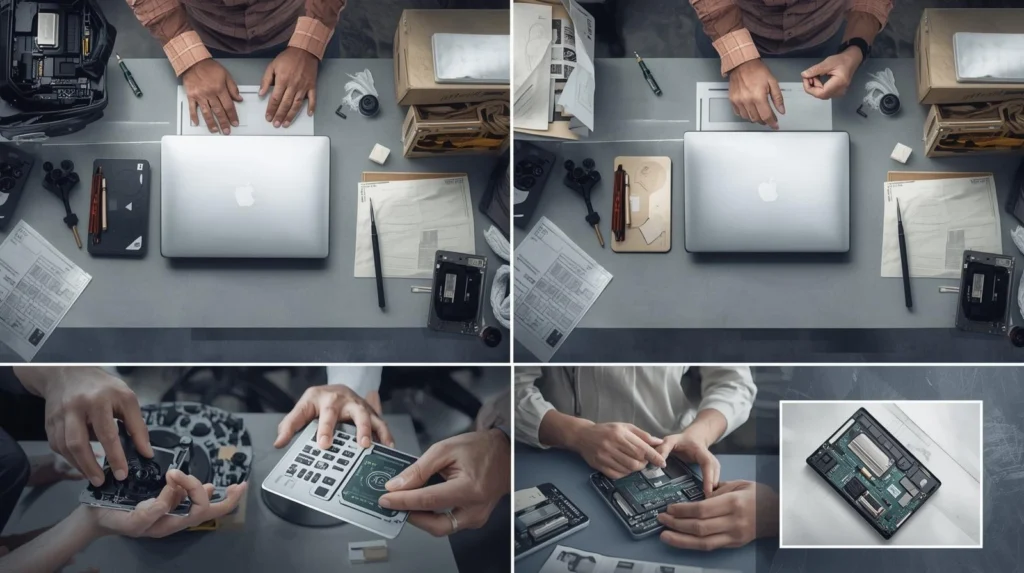
How to Diagnose Dell Laptop Hardware Problems
Before jumping into repairs, it’s important to properly diagnose the problem. Dell laptops, like many others, are equipped with built-in diagnostic tools that can help identify hardware issues. Here’s how you can use them:
Step 1: Dell Diagnostic Tool
- Run Dell Diagnostics: Press F12 during startup and select “Diagnostics” from the boot menu. This tool runs a series of tests on your hardware components, such as the CPU, memory, graphics card, and hard drive.
- Check for Error Codes: If the diagnostics tool finds an issue, it will display an error code. This code can be used to search Dell’s support website for more information about the issue.
Step 2: Manual Inspection
- Check for Physical Damage: Inspect your laptop for visible signs of damage like cracks, dents, or exposed wires. These could be indicators of hardware failure.
- Listen for Unusual Sounds: Pay attention to any strange sounds from your laptop. A loud or intermittent noise could suggest a malfunctioning fan or hard drive.
Steps to Fix Dell Laptop Power Supply Issues
Power-related problems are among the most common hardware issues in Dell laptops. Here’s how you can fix them:
Step 1: Check the Power Adapter and Cord
Ensure that your power adapter is properly connected and there’s no visible damage to the cord. A frayed cord or loose connection can prevent your laptop from charging.
Step 2: Inspect the Charging Port
Look for any debris or damage in the laptop’s charging port. Clean the port with a soft brush or compressed air. If the port is damaged, you may need to replace the motherboard or have the charging port repaired.
Step 3: Battery Health Check
Dell laptops often come with battery health monitoring tools. Use Dell Power Manager or BIOS diagnostics to check the battery’s condition. If the battery is defective, it might be time to replace it.
How to Repair a Faulty Dell Laptop Screen
A cracked or malfunctioning screen is another common hardware issue. Here’s a step-by-step guide for troubleshooting and fixing your Dell laptop screen:
Step 1: Check for External Display Output
- Connect your laptop to an external monitor. If the external monitor works, the issue lies with your laptop’s screen.
- If no display appears on either screen, the problem may be with your laptop’s graphics card or motherboard.
Step 2: Inspect Screen Backlight and Display Cable
If your screen flickers or is dim, the backlight or display cable might be damaged. You can try gently pressing the screen at different points to see if the display comes back. If the screen works intermittently, replacing the screen or display cable could fix the problem.
Step 3: Screen Replacement
If there are cracks or significant damage to your laptop’s screen, you’ll need to replace it. Ensure you order the right replacement screen model for your specific Dell laptop series. Many tutorials are available online, but if you’re unsure, it’s best to consult a professional technician.
Dell Laptop RAM Upgrade: When and How
Upgrading your RAM can breathe new life into an old Dell laptop, making it faster and more capable of handling heavy workloads. Here’s how to upgrade your Dell laptop’s RAM:
Step 1: Check for RAM Slots and Compatibility
- Use the “Task Manager”: Check your current RAM usage to determine if you’re maxing out the available memory.
- Verify Slot Availability: Open your laptop’s service manual to check if it has empty RAM slots for expansion or if you need to replace the existing RAM.
Step 2: Choose the Right RAM
Make sure you purchase the correct RAM type (e.g., DDR4) and ensure compatibility with your laptop’s motherboard. Dell’s official website or your laptop’s user manual will have information on supported RAM sizes and speeds.
Step 3: Install the New RAM
- Power off the laptop, remove the battery, and unplug the device.
- Open the back panel and carefully install the new RAM in the empty slot or replace the existing RAM.
- Secure the panel and reboot your laptop. You should notice improved performance if the upgrade is successful.
Dell Laptop Cooling System: Cleaning and Replacement
A dirty or faulty cooling system can lead to overheating and poor performance. Here’s how to clean and maintain your Dell laptop’s cooling system:
Step 1: Dust Cleaning
Use compressed air to clean out dust from the fan and vents. Ensure the air is directed at the intake and exhaust vents, which are typically located on the sides or back of the laptop.
Step 2: Thermal Paste Reapplication
Over time, the thermal paste between the CPU and heatsink can dry out, causing inefficient heat transfer. Carefully remove the heatsink and apply a fresh layer of thermal paste to the CPU for improved cooling.
Step 3: Fan Replacement
If your laptop fan is loud or not functioning, it may need replacement. Check for signs of wear, like excessive noise or erratic behavior. Replacing the fan requires disassembling the laptop, so if you’re not confident, it’s best to seek professional help.
Diagnosing and Replacing a Faulty Dell Keyboard
A malfunctioning keyboard can significantly hinder productivity. Here’s how to troubleshoot and replace it:
Step 1: Check Keyboard Connection
Sometimes, the issue may be due to a loose or faulty connection. Power off the laptop and check if the keyboard is securely connected to the motherboard.
Step 2: Software and Driver Check
If the keyboard is not responding, it could be a driver issue. Go to Device Manager and check if the keyboard is listed under “Keyboards.” If not, reinstall or update the driver.
Step 3: Replace the Keyboard
If the keyboard is physically damaged, you’ll need to replace it. Dell keyboards are model-specific, so ensure you purchase the correct replacement. Many Dell laptops allow you to easily remove and replace the keyboard, but some models require more in-depth disassembly.
Troubleshooting Dell Laptop Hard Drive and Storage Issues
Your laptop’s storage drives are crucial for smooth performance. Here’s how to troubleshoot and fix common hard drive issues:
Step 1: Check for Hard Drive Errors
- Use Dell SupportAssist to run diagnostics on your hard drive. This tool will help detect errors and give you a report on the health of your storage device.
- CHKDSK Command: Run the chkdsk command in the command prompt to scan and fix logical disk errors.
Step 2: Backup Data
If your hard drive is failing, it’s essential to back up any important data. Use external drives or cloud storage to save your files.
Step 3: Hard Drive Replacement
If your hard drive is beyond repair, replacing it with an SSD (solid-state drive) can significantly improve your laptop’s speed and performance. Ensure the new drive is compatible with your laptop model and install the operating system once the replacement is complete.
Conclusion and Pro Tips
Repairing your Dell laptop’s hardware doesn’t have to be daunting. With the right tools and knowledge, many common issues can be easily addressed. However, if you find yourself overwhelmed or unsure, don’t hesitate to contact a professional technician.
Pro Tips:
- Regularly clean your laptop’s vents and fans to prevent dust buildup.
- Always back up your data before performing any hardware repairs.
- If replacing hardware yourself, ensure you have the proper tools and follow safety protocols to avoid damaging your laptop further.
FAQ Section
- How do I know if my Dell laptop battery needs replacing?
If your laptop frequently shuts off without warning or takes too long to charge, it could be time for a new battery. You can check the battery health using Dell’s built-in diagnostic tool. - What should I do if my Dell laptop screen goes black but the power is on?
First, check if the laptop is displaying on an external monitor. If it is, the issue might be with the screen or its connections. If not, you may need to replace the graphics card. - How do I troubleshoot my Dell laptop fan?
If your fan is making loud noises or not spinning properly, clean it with compressed air. If that doesn’t work, consider replacing the fan. - Can I upgrade my Dell laptop’s RAM?
Yes, most Dell laptops allow RAM upgrades. Check your laptop’s specifications for the supported RAM type and capacity. - How often should I replace the thermal paste in my Dell laptop?
Thermal paste should be replaced every 2-3 years, or whenever you experience high temperatures during use. Reapplying thermal paste can significantly improve cooling efficiency. - What should I do if my Dell laptop is overheating?
Ensure your laptop is free of dust, and replace the thermal paste if necessary. Use a cooling pad to improve airflow and reduce temperature.